Model Railway Forum banner

Bachmann 9F Engine-Tender Coupling

6.2K views 12 replies 9 participants last post by  Graham Plowman  
#1 · (Edited by Moderator)
I have a pair of 9Fs each with the BR1F tender. I've recently added some more vans to create a proper fast freight train - 24 vans in total. Although the 9Fs have no trouble at all with this load, it seems the bar coupling between engine and tender is not up to the job. The bar seems to repeatedly slip off the tender peg, leading to the rear of the tender lifting up. This causes both derailments and the tender separating from the train. I've tried swapping tenders between the two locos as well as with one from a standard 5MT but the result is always the same.

It looks to me like a design problem: the pin has to be short since otherwise the bar can't be attached to it through the opening in the tender drawbar slot. Has anyone else got the same problem, or better still has anyone devised a solution?

Thanks
 
#2 ·
Hi RFS,

Not had this problem with my 9f or any other bachmanns to be honest. Some of mine (sound fitted) are permanently coupled (loco/tender) using a tiny pin glued into the middle of the tender pin - that might be a solution.

I am wondering if the coupling from the tender to the first wagon are at the same height. Are they standard factory fitted tension couplings?

Also do the tender front wheels sit on the rails correctly or can it rock up and down (see-saw) around the centre wheels? thus the weight lifts the tender front edge and you loose coupling.

Also make sure the drawbar is done up - had some of them come loose in the past

Try a packing piece on the loco end to raise the height slightly (washer) as I do note that my 4mt one moves up and down quite a bit.

Sorry can not be more help

Best regards

Steve
 
#3 ·
*** I understand why it happens... There isn't much meat to spare on that pin. If the bar has any play, and especially if there are any non-flat parts on the layout, then the connection IS a bit tenuous. Perhaps a slight bend upwards in the drawbar may help - just a few degrees will be enough. Alternately replace the pin with an equivalent brass BA bolt of slightly more length...

Having noticed that models often have the real position for the loco-tender drawbar mouleded into the plastic I have actually started moving the whole thing to that position and permanently coupling them... It then allows me to add connection detail / use the wires between loco and tender for sound and pickups to represent the other prototype connections as the higher position gives space to do it that way. Lots of work I admit, but it really does work well and to me at least, looks good.

Regards

Richard
 
#4 ·
QUOTE (Richard Johnson @ 1 Mar 2011, 14:53) <{POST_SNAPBACK}>Having noticed that models often have the real position for the loco-tender drawbar mouleded into the plastic I have actually started moving the whole thing to that position and permanently coupling them...
Hi Richard,

That's a fantastically good idea - I never thought of changing the coupling position and can see many advantages to doing it on sound equipped locos. Do you have any pictures of how you have done this please or a link to where you have detailed this elsewhere if you have time

Thanks for the idea

Kind regards

Steve
 
#5 ·
*** No pictures currently, but I'll try to find some time to take them soon

regards

Richard
 
#7 ·
Thanks for all your replies. Carefully bending the bar upwards slightly has almost fixed the problem - just needs a final bit of adjustment. The locos are 3 years old and have not given trouble before: perhaps it's the extended-length freight train that has finally shown up the fault.

Couplings between tender and first van are Kadees - at the right height but, when the rear of the tender is lifted up by the tender coupling bar getting stuck underneath, they were in the habit of occasionally parting.
 
#9 · (Edited by Moderator)
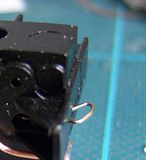
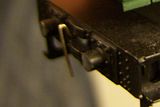
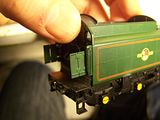
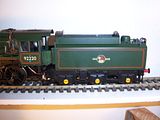
I've adjusted the loco-tender drawbar on a few Bachmann 9Fs, and a couple of Standard 5s as well, by using the method in the pictures.

Make a small figure of 8, round at the front end and flat at the rear, using 0.45 NS wire and a light touch with the iron. This goes through the drag beam, fits around the plastic locating lug in the chassis and is secured by the body fixing screw.


For the tender, make a hook as shown, which fits around the existing plastic pin in the tender. Secured with epoxy


It is fully adjustable according to your curves, but if you have wide radii, you can file down the tender buffers and close couple it as below.


With a set of Brassmasters doors attached to the tender as on the prototype, it makes a big difference.

This will run with 14 Mk1s without any issues, so I'd imagine a 24 wagon freight would be OK, but I haven't accumulated enough of them yet!

The chassis has been weighted. There are a bunch of other detailing mods as well. Injector pipework, water feed pipes from tender, front bogie, WR lamp irons, brass smokebox door dart, lifting rings and some copper paint on the existing pipes. A bit of weathering, coal and crew to complete.

I've put these pics up as clickable thumbnails - let me know if that is wrong!

Iain
 
#11 ·
Same thought as Simon. Mine were all bought quite soon after the release of this model and it is getting the drawbar off the under tender peg that is the challenge. Maybe there has been a minor tooling mod to make that easier, and they have gone too far?

Like Iain I have gone for closer loco to tender coupling, but by putting another hole in the drawbar to enable the loco and tender to be at scale distance; then filing down the intermediate buffers to allow the combination to swing enough for the layout curves. Provided you are prepared to modify near invisible detail, a 9F with tender at scale distance can be got to go round any set track curve the loco alone will negotiate. (This applies to almost all UK locos with the rear driver under the cab, the manufacturers are far to conservative.)

Bach's model will comfortably start and pull past 100 four wheel wagons on level track, I should be very surprised at anyone dissatisfied with its' traction.
 
#12 ·
The device is a bit of a pain, some Bachmann locos have a twin position available such as the Ivatt 4MT and the BR std 4MT, the system is fragile so although the bar is strong enough the plastic pin is vulnerable also watch the bottom of the slot this can break off then the bar drops out on a regular basis, a poor system really, solutions above explained well but also I have repaired the bottom slot on some cases (Ivatt 2MT).

The J39 has the Mainline style tender hook and these break off or are of variable length and short one will unhook itself and away goes the loco sans train.

Often wonder why manufacturers do not use the old Dublo metal bar and then use it to carry tender wheel pick up, last for ever job done, still again Hornby system is better than anything Bachmann have devised so far.
 
#13 ·
QUOTE (RFS @ 1 Mar 2011, 22:04) <{POST_SNAPBACK}>I have a pair of 9Fs each with the BR1F tender. I've recently added some more vans to create a proper fast freight train - 24 vans in total. Although the 9Fs have no trouble at all with this load, it seems the bar coupling between engine and tender is not up to the job. The bar seems to repeatedly slip off the tender peg, leading to the rear of the tender lifting up. This causes both derailments and the tender separating from the train. I've tried swapping tenders between the two locos as well as with one from a standard 5MT but the result is always the same.

It looks to me like a design problem: the pin has to be short since otherwise the bar can't be attached to it through the opening in the tender drawbar slot. Has anyone else got the same problem, or better still has anyone devised a solution?

Thanks

I had this problem with mine.

I tried Richard's solution of bending the coupling first, but found that the plastic 'pin' really didn't have enough length to retain the coupling on it and at the same time, the coupling has so much vertical 'slop' movement that it became detached very easily.

I removed the plastic 'pin' on the tender, took the tender body off, drilled a hole from the top and replaced the pin with a longer screw. Problem solved.

Graham Plowman